Upgrading Valkyrie Headlight Circuit for High Power Bulbs
risk of damage to the existing headlight circuit. Power is
supplied to the filiments via seperate circuits that are activated by two relays, which in turn are controlled by the original headlight power circuits.
Consequently, the power through the original circuits are significantly less than stock, which should increase the lifetime of those circuits, especially the
high-low beam switch. I originally recommended using a dual relay which is what I used in these pics, but you can save about $15 by using two general
purpose relays from Pep Boys (or any other auto parts outlet).
Cost
$23 not including the high output bulb
Time
Materials
- 1 8ft length of multistrand 14 gauge wire
1 8" section of loom
1 20amp inline fuse with 14ga wire
1 partial roll electrical tape
2 sizes for 18GA and 14GA wire, heat shrink tubing
2 general purpose 3-wire relays, at Pep Boys, Motormite PN 84607
2 sizes wire ties
1 self tapping sheet metal screw
1 medium washer
1 stick hot melt glue
3 14 ga female quick disconnect spade connectors
2 18-22ga female quick disconnect spade connectors
1 high-watt headlight bulb, one place it's available is Competition Accessories, http://www.compacc.com/index.html to order their catalog/ order
stuff. High watt bulbs available from C.A. are 100/55, 100/80, 100/90, 130/90. FYI stock wattage is 60/55
Tools
Wire stripper
needlenose pliers
soldering iron
elect solder
flux
glue gun
phillips screwdriver
10mm wrench
Process
Remove the seat, gas tank and the headlight. Disconnect positive lead on battery. Solder 14GA wire to one end of the inline fuse wire after positioning
shrink tube on the wire. Shrink the tube over the splice. Drill appropriate hole in fitting on end of main battery cable. Strip 1/2" of end of other wire on
inline fuse, form into loop to fit screw, tin it with solder and affix the wire to the cable with the screw. Run the 14GA wire along the frame taking care it is
not subject to pinching from anything (like the tank) and secure it with wire ties.
Pass the wire through the hole in the back of the headlight shell, and slip the
loom sleeve over it. Pass the loom half way through the hole and secure it to the other wire looms with small wire ties. Cut the wire off, leaving about ten inches beyond the end of the loom.
Cut the wires close to the headlight plug. Carefully remove the contacts from the plug (depress the spring catch on the brass). Open the crimp using a sharp tool, remove the wire.
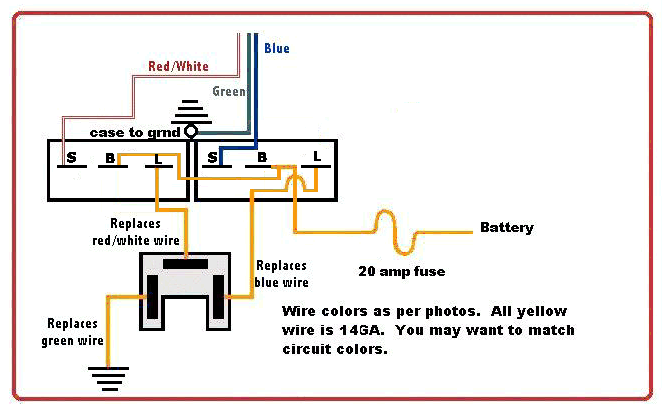
Referring to the wiring diagram and the picture, assemble the circuit in the diagram using the connectors, heat shrink tubing, electrical tape, solder, and
three pieces of the 14GA wire each about ten inches long. Carefully reuse the three plug contacts by recrimping them. (I also soldered them, and have not
had a problem with the solder melting.) Use one of the forward screws in the bottom of the headlight shell to ground the two wires, using the washer.
Bend the mounting flange of the relay, and open the hole slightly to mount the relay using the rear bolt in the bottom of the shell. Also NOTE - the
headlight shell gets a lot of water in it - so use a hot glue gun and seal the back of the relay. Use heat shrink tubing and electrical tape to completely
insulate the quick disconnects.Reconnect the battery and do a smoke test.
I have about 25,000 miles on this mod, and am pleased it hasn't melted the
headlight lens. I note slight fogging of the headlight reflector but it is insignificant considering the time and heat I've been running this mod. You
may want to re-aim the light a little higher to use all those watts - turn in the right adjuster to move the aim up - the 130 bulb will light up the road for a measured 1/2 mile.
|