NOTICE: These are tech pages explaining how I did these mods to my bike. In almost every case - |
A Premium Air System MarkT
Rationale This one started out as simply the LOUDEST air horn I could find. It occurred to me that you can only get real volume out of an air horn if it has a lot of potential energy already stored up in the form of air pressure in a tank. Hmm, there's a lot of room under the swing arm for a good sized tank. OK, now that I'm going to have an air tank, I might as well plan to use it for other stuff - like an air suspension and auxiliary hose for filling tires. This is a Hadley Bully air horn meant for large RV's and trucks. Decible rating 132 - but it's an HONEST 132db not the B.S. 133 Freeway Blasters claims for it's electric horns. I tried those first, a fraction of the volume of these and ruined if you get them wet - what a crock. Where these are mounted on the engine bar, if you blow it without a helmet your ears will ring. These positively CANNOT BE IGNORED. You do not want to mount them behind you. So I put it all together. Wasn't that hard or expensive. Before I installed the spots (next article, maybe) I rode with my thumb on the horn button - and blew it several times at cagers who were pulling out after looking right through me. Gotta tell ya, I am positive several of those yahoos went back inside to change their undies after the look I put on their faces - "OH MY GOD IT'S A CEMENT TRUCK" I also have been the good guy a few times - recall the soccer mom whose Caravan had a flat; pulled her over and rescued her on the spot. Not to mention, my ride has the smoothest back seat of any cruiser - since I tailor the ride not only to the exact weight of the babe on the back, but also to the quality of the road surface - at 70 per without missing a beat. Tell ya what, I'm getting to the point where I could play The Jerk at a carnival - guess the weight of any babe within 5 lbs. just by eyeballin her once over. And a great excuse - "Not to worry, it's not an ogle, just estimating the air pressure I need to use..." I haven't figured out how to work a squeeze or two in there yet.
Cost $250 for the Hadley kit. If you install an air suspension to go with it, about $600, including the Hadley system and Progressive 416 shocks Time 2-3 days Materials Tools
Process Remove the gas tank and the seat. Be sure to unscrew the phillips screw inside the petcock handle. There are three hoses to disconnect from the tank. Remove the right side cover. Install the air tank It's pretty easy to install the tank, hanging it off the kickstand support using erector-set steel (not sure what they call that stuff but you can find
it in any big hardware store). Hang the tank with the tank mount studs vertical, not horizontal so you don't cause a leak in the tank at the studs'
juncture with the pressure vessel. I also used large hose clamps to make the mount stronger. Install the compressor First you need to move all of the electrics under the right cover. Pull the fuse blocks from their mounts, tuck all of the wires above the battery after wrapping them well with electric tape, and use the Dremel to cut all the plastic fuse mounts off the side of the battery box. Weld a metal plate to serve as the compressor mount as per the picture and paint it. Attach the compressor to the metal plate. Install the horn
You need to fabricate a mount to hold the horn. I found the best place to put it, where it won't interfere with Baker Wings, is off the existing horn
mount bolt hole, with a custom bracket. I just shaped one out of galvanized channel steel I had laying around. This was before I had a
metal shop with cutting and welding equipment - now I would just weld together a mount using box tubing and plate steel. I needed to attach an
adjustable 1" clamp around the engine guard and pressing against the underside of the horn to dampen vibration. Install the 416 air shocks
This is straightforward, just install as per Progressive's instructions. Don't plumb them yet. Install the shock system's air valves
See the pic. This is the best position for them I found, having tried several. Note the only thing holding them there is wire ties. These work
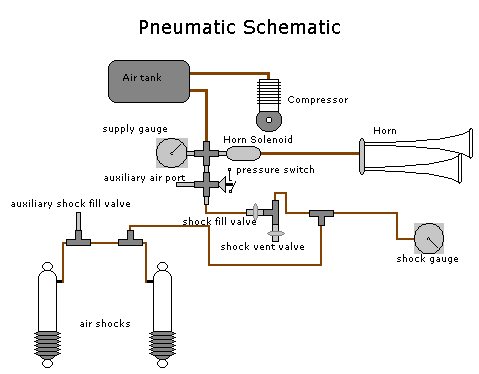
surprisingly well. The upper valve brings air in from a manifold from the air tank into the T-fitting. The upper end of the T connects to the closed air
shock lines. The lower end connects to the vent valve. So you add pressure with the upper valve and bleed it with the lower. Install the air gauge
I mounted it using wire ties onto the upper arm of the right Baker Wing. Install the compressor power switch I put it in the right gusset in front of the tank, and sourced the power
directly from the battery via a 20 amp fuse. I want to be able to power the compressor without the ignition, and the ignition without the compressor
running (when on dusty roads I don't want it running). When you run wires along the frame, ensure they won't be pinched or chaffed and wire tie them securely. Route and connect the pneumatic lines
Compressor System This system uses 1/8" compression lines, as follows:
You will need several compression fittings. I found the metal compression rings seal more reliably than the nylon ones. Use Teflon tape on every thread. Air Shock System
This system uses much smaller lines to minimize the effect of compression in the shocks propagating through the lines and impeding
the rate of compression in the shocks. Try to minimize their length. The lines are connected as follows: One T-fitting - the filler valve provided by Progressive, installed as backup, visible in the compressor pic, wire tied to the right frame member. T-fitting - connects to t-fitting at fill and bleed valves, this is where pressure is added or removed in normal use. Wire the electrics Run power from the power switch to the marked power input for the compressor. Attach the compressor ground wire to ground. Connect the pressure switch wires. Run the power lead from the horn switch (disconnect at the stock horn and splice in a longer wire) to the air solenoid, and the other lead of the solenoid to ground. Test for leaks Mix a solution of liquid soap and water and put in an aerosol sprayer. Spray all of the connections. Turn on the compressor. Tighten every connection that bubbles. If it still bubbles disconnect, retape, reconnect and retest it.
|

All technical mods described here are merely reports of what I've done. You may attempt to replicate them at your own discretion and risk if you choose. Horseapple Ranch, LLC and Mark Tobias will in no way be responsible for the results of your attempting to perform these mods on any motorcycle, regardless of the outcome.
All content on www.horseapple.com copyright 1999-2006 Mark Tobias except "Riders Say", "Dyno Day", Vallejo and Shop Manual and Alternator Review pages, and SWF and MP-3 files and
their graphic icons, and any content specifically attributed to another author.
All rights reserved.